Knife Sharpening Under the Microscope
Knife Sharpening Under the Microscope


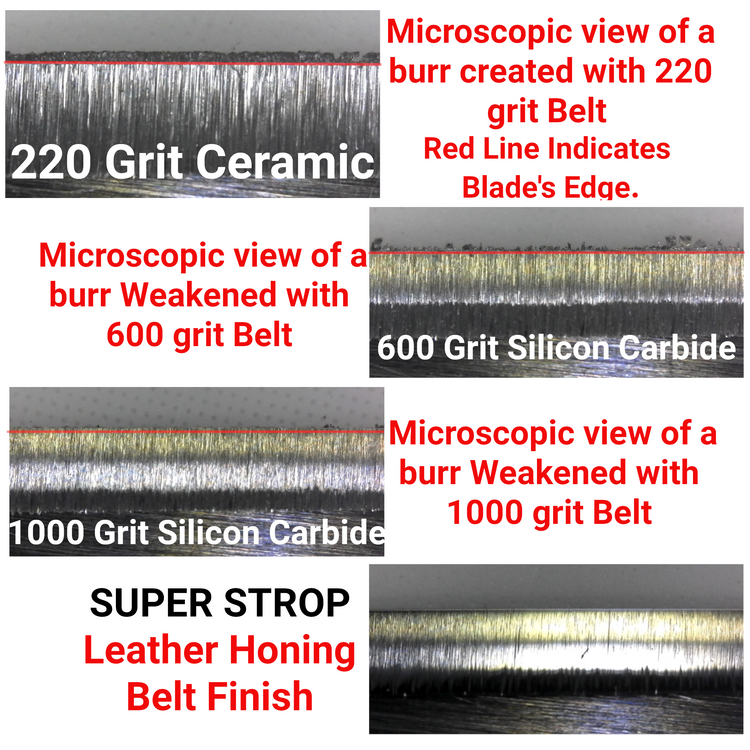
Let's take a look at what is happening to the edge of a knife's blade as we sharpen with a SUPER STROP Knife Sharpening Belt Kit
We'll begin by looking at our edge before we begin to sharpen. The knife was in decent condition but showed signs of use and demonstrates a "Toothy Edge" very well. This is a kitchen knife and the "Toothy Edge" is commonly preferred in Food Service both home and commercial.

You'll notice the edge isn't perfectly straight. You can also see very small fold overs. These are areas where a burr wasn't completely removed and have pressed over the edge. Generally these are not good but are very easy to fix. Let's establish a new perfectly straight edge.

And we have a Burr!! Also commonly referred to as a wire or feather edge also.
This is your main goal in sharpening. Once you've created a consistent and even burr, Stop removing metal. The knife has no more "potential sharpness" past this point. Your new sharp edge is actually already created in a sense. You just have this pesky burr in the way of and attached to it. So let's weaken and then remove that burr.

You can clearly see here the burr is much smaller now after a 600 Grit Belt, but we still have that same edge, just smoother, that was created with the 220 grit belt. The burr has been sufficiently weakened to move to the next step. If you are looking for an extreme luster polish, you can spend more time with each grit to decrease the "toothiness" of the edge.
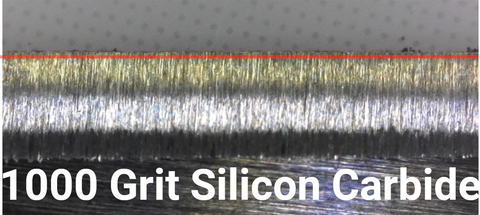
My line here is a little crooked, I know. But, you'll see what the 1000 grit silicon carbide belt does to the burr left by the 600 grit belt. The knife is sharp at this point. But, removing the miniscule burr you see above will lengthen the life of the edge. Those small bits of burr, if left behind, will dull the edge as you use the knife.
Managing your pressure through your grits is important. You can ROLL or ruin the edge at any time with any belt if you do not manage your pressure and angle.
And Finally, we get to the Super Strop 1X30 Leather Honing Belt w/ white buffing compound below.

There's a reason we call it a Super Strop.
The knife's edge was marked so the same section of blade is in each of the preceding photos. 2-4 Passes were made on either side of the blade for each belt and photographed directly after. These results are 100% accurately represented. I sharpened this knife on a Harbor Freight 1x30 Belt Sander using our 1X30 Super Strop with 4 Pack Assorted Belt. Pictured Below

You Can Take the Polish Further

Comment with any questions and Happy Sharpening!!
Jesse C.
Pro Sharpening Supply
Hi Dan, Thanks for your question. The digital scope I used has a magnification range of 60X-250X. The distance determines the level of magnification. I would guess these photos are in the 200X range based on the distance. I hope this helps!
Jesse C. Pro Sharpening Supply
Would you please share how much magnification was used to obtain the images? Thanks for the article. It’s very informative!